Containers & Virtual Machines
Virtual machines, containers, Docker, and building a lab of your own.
Virtual machines and containers both let you run an operating system inside your operating system. They solve overlapping problems in very different ways, and knowing which to reach for is a genuinely useful skill. Nearly every job posting in software or security mentions one or both.
This page also covers the practical side: how to actually get a VM running so you have somewhere safe to experiment.
On this page
Virtual machines
A virtual machine virtualizes the hardware and operating system. A virtual machine contains the entire OS and its application state. Early cloud applications were primarily based on virtual machines. They solved a lot of problems, but they have a few issues.
Issues with VMs
- Start-up time
- Bringing VMs up and down requires the OS boot process
- Size
- Entire OS and libraries replicated in memory and file system
- Requires large amounts of resources (RAM) to multiplex guest OSes
- You want the isolation VMs provide without full replication of the software stack
- Not quite portable
- VMs running on one cloud provider under one hypervisor cannot be run on another cloud provider under a different one without modification
- For example, moving an AWS EC2 instance to Google Compute Engine
Running a VM on your own machine
None of that stops a VM from being the right tool on your laptop. It is the safest way to try Linux, and the only sane way to run intentionally vulnerable machines for security practice.
You need a hypervisor, which is the software that runs the VM:
- VirtualBox is free, cross-platform, and the usual starting point.
- VMware Workstation is free for personal use and generally faster.
- KVM with virt-manager is built into Linux and is what I use.
- Hyper-V ships with Windows Pro. Note that enabling it can interfere with VirtualBox.
- UTM is the practical option on Apple Silicon Macs.
Then you need an operating system image. Ubuntu Desktop is a reasonable first choice. Download the ISO, create a new VM in your hypervisor, point it at the ISO, and install.
Sizing a VM Give it at least 2 CPU cores, 4 GB of RAM, and 25 GB of disk if your machine can spare it. Too little RAM is the most common reason a VM feels unusably slow.
Learn to use snapshots A snapshot saves the entire state of the VM so you can return to it later. Take one after a clean install and before anything risky. Being able to break a machine badly and roll it back in ten seconds is most of the value of working in a VM.
Containers
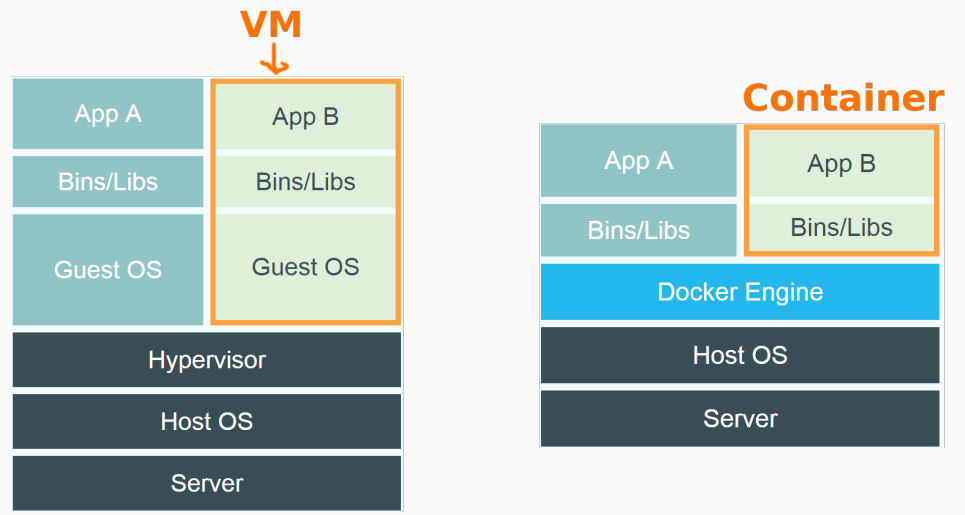
Containers attempt to solve the shortcomings of virtual machines. They do this by virtualizing the operating system instead of the hardware:
- The container provides only the application and its libraries, running in user space
- The operating system is not replicated, but shared by the containers
- Each container sees its own virtual operating system
The following image illustrates the differences between a VM and a container:
Benefits
- Provides similar isolation and protection, but with lower overhead than VMs
- Fast starting, which is better for autoscaling than VMs
- Memory footprint much smaller than a VM, supporting 4 to 6 times more
- Portable
- Images contain all files and libraries needed to run
- Runs the same on any compatible underlying OS
- Repeatable
- Runs the same regardless of where it is run
- Runs on any cloud provider the same way
- Solves the “works on my machine” problem
Containers are now one of the preferred virtualization strategies for cloud use.
Beyond containers
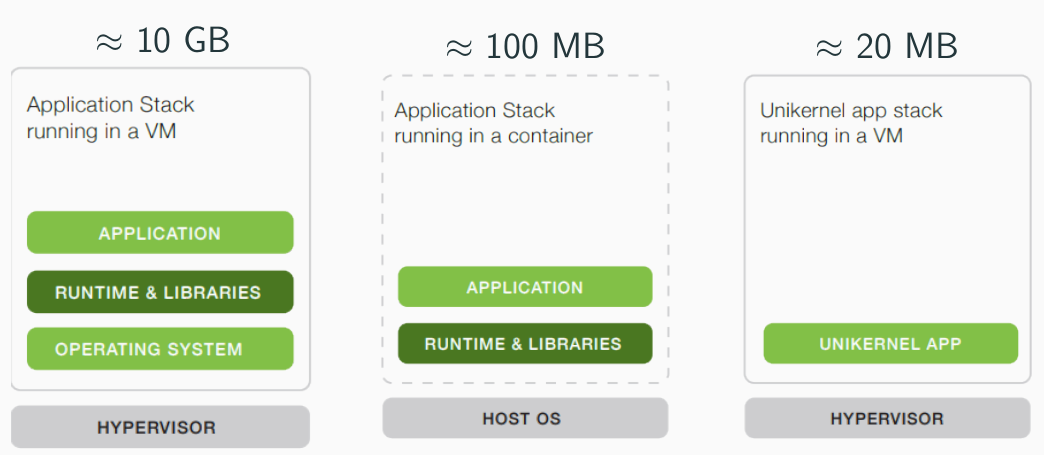
Containers solved many of the shortcomings of VMs, but the idea did not stop there. Two directions worth knowing about:
Unikernels are single-process programs compiled to run
directly on (usually virtual) hardware rather than inside a full operating
system. If a container exists only to run one application, why ship the USB
subsystem, a filesystem, and /bin/ls with it? A unikernel includes only the
library and OS parts that one application actually needs, which means lower
operating costs, faster response to events, and a smaller attack surface.
WebAssembly is a low-level language that brings near-native performance to browser applications and lets developers build high-speed web apps in the language of their choice. It is increasingly used outside the browser too, and some people think it may replace containers for certain cloud workloads because of its smaller size and security properties. Mozilla’s WebAssembly guide is a good overview, and Docker has written about why containers and WebAssembly work well together.
Docker
Docker is a brand of container and is the standard.
Terminology
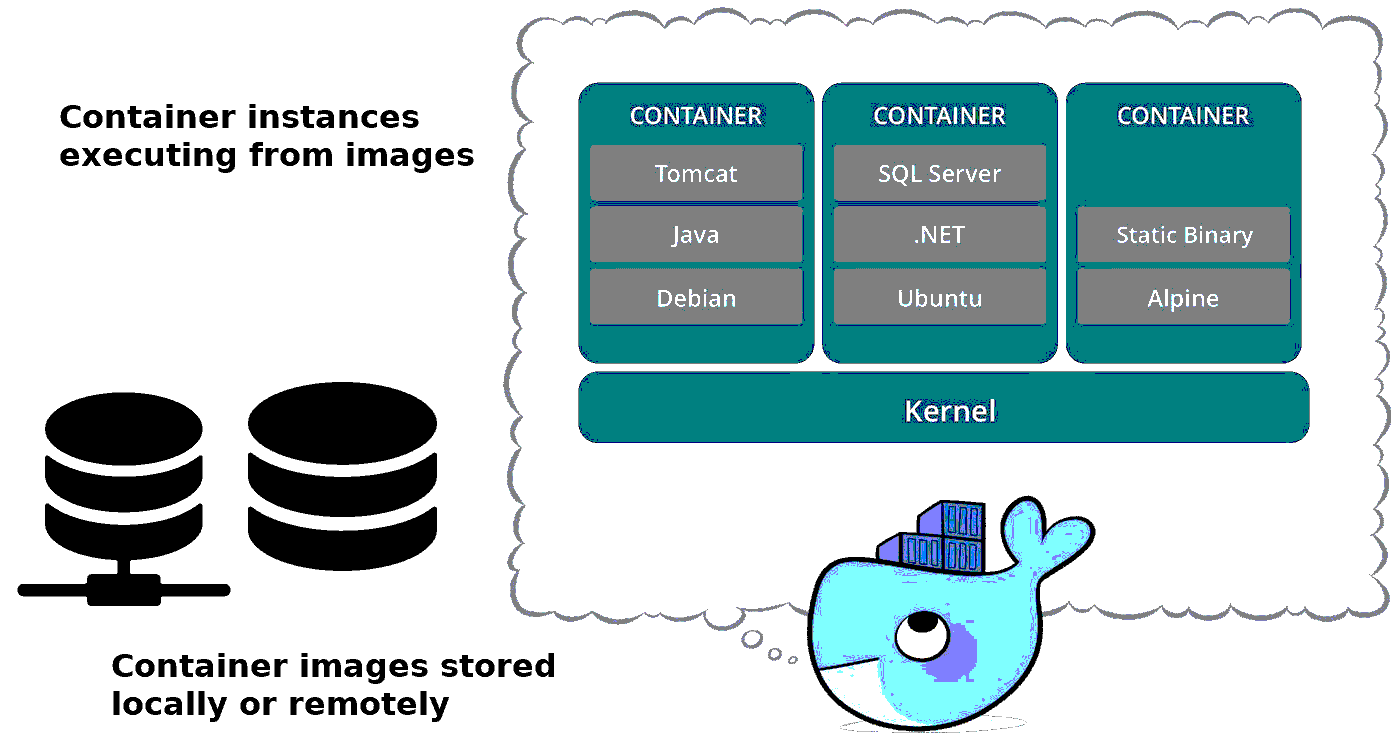
- Container image
- Static file containing all libraries and dependencies
- Like a program binary
- Container
- Live instance of a container image running
- Like a running process
Registry
A registry is a GitHub-like repository for container images: cloud-based storage and distribution for your images, either public or private.
- Docker Hub (docker.io)
- Google Cloud Container Registry (gcr.io)
- Azure Container Registry
- Amazon EC2 Container Registry
- Bintray.io / Artifactory
- Quay.io
- GitHub Container Registry
Docker Engine
The Docker Engine is a runtime management system. It allows the user to build, push, and pull container images. It can also create, destroy, start, and stop containers.
Installing Docker
This is as simple as downloading the appropriate application from https://docs.docker.com/get-docker/.
In a Linux OS, you can also use the command line:
sudo apt install docker.io -y
sudo usermod -a -G docker $(whoami)
The second command adds you to the docker group so that you are able to run
the docker commands without sudo. Log out and back in for it to take effect.
Specifying a container image
A container image is specified with a text file named Dockerfile, similar to a
Makefile. Here is an example:
# Use Ubuntu 20.04 as the base image
FROM ubuntu:20.04
# Specify your e-mail address as the maintainer of the container image
LABEL maintainer="Your Name <you@example.com>"
# Execute apt-get update, install Python's package manager in container (pip)
RUN apt-get update -y
RUN apt-get install -y python3-pip
# Copy the contents of the current directory into the container directory /app
COPY . /app
# Set the working directory of the container to /app
WORKDIR /app
# Install the Python packages specified by requirements.txt into the container
RUN pip install -r requirements.txt
# Set the program that is invoked upon container instantiation
ENTRYPOINT ["python3"]
# Set the parameters to the program
CMD ["app.py"]
For more information, see the Dockerfile reference.
A note on MAINTAINER
Older Dockerfiles use a MAINTAINER instruction. It is deprecated, and a
LABEL maintainer= line does the same job. You will still see MAINTAINER in
plenty of examples online.
Docker commands
Building a container image, similar to make. A Dockerfile must be present:
docker build
The build command has options. The -t flag lets you name the image:
docker build -t flask-hello-world:latest .
Note that the dot is necessary. It specifies to build in the current directory. You can replace the dot with a full path.
To name it as a Docker Hub image, add your Docker Hub ID:
docker build -t <dockerhubID>/flask-hello-world:latest .
docker build -t pouliotd/flask-hello-world:latest .
Uploading an image to Docker Hub
First you need to log in:
docker login
Then tag the image from the local repo to a Docker Hub container image:
docker tag flask-hello-world pouliotd/flask-hello-world
Then push to the Docker Hub repo:
docker push pouliotd/flask-hello-world
Downloading a container from Docker Hub
Retrieve a container image from Docker Hub to the local repository:
docker pull pouliotd/flask-hello-world
View all container images stored locally, similar to ls /bin:
docker images
Remove a local container image, similar to rm /bin/<cmd> or apt remove. This
assumes its containers have been deleted:
docker rmi <name of container image>
Container commands
Create a container based on an image name (local or remote), then start it:
-itruns it interactively-ddetaches the container to allow it to run in the background-pmaps a host port to a port on the container
docker run -d -p 8000:5000 pouliotd/flask-hello-world
View all containers, active and stopped, similar to ps auxww:
docker ps -a
Stop a running container, similar to kill -STOP:
docker stop <name of container>
Start a stopped container, similar to fg or kill -CONT:
docker start <name of container>
Attach to a running container:
docker attach <name of container>
Execute a command on a running container. Use -it /bin/bash to get a shell:
docker exec -it <name of container> /bin/bash
Get the log file output of a container for debugging:
docker logs <name of container>
Create a container image from a container:
docker commit <container id> <image name>
Remove a container:
docker rm <name of container>
Try it
Run docker run -it ubuntu bash. You now have a shell inside a fresh Ubuntu
container. Install something, create a file, then exit and run it again. Notice
that everything you did is gone. Understanding why is most of what makes
containers click.
Keeping images small
While containers are much smaller than VMs, they can still take up significant space. The base layer is one of the primary determinants of size. For example, the Alpine base layer is much smaller than the Ubuntu base layer because Alpine is designed for containers.
In addition to the base layer, there are changes you can make to Dockerfiles to make the images smaller:
- Use a small base layer (Alpine, Ubuntu minimal, BusyBox)
- Do not install unnecessary dependencies
- Skip the package cache, since there is only one install:
RUN pip install --no-cache -r requirements.txt aptsupports--no-install-recommends,apksupports--no-cache- Clean up after installs:
rm -rf /var/lib/apt/lists/*for apt,rm -rf /var/cache/apk/*for apk
- Skip the package cache, since there is only one install:
- Use compression tools such as docker-squash
- Use as few layers as possible via one large
RUNline- Each line in a Dockerfile turns into a layer
- A layer that installs software followed by a layer that removes it does not decrease the size of the container
- The example below installs curl, gcc, and make to build a binary, then removes them before they are committed to a layer
RUN apt-get update && \
	apt-get install -y curl make gcc && \
	curl -L $TARBALL | tar zxv && \
	cd redis-$VER && \
	make && make install && \
	apt-get remove -y --auto-remove curl make gcc && \
	apt-get clean && \
	rm -rf /var/lib/apt/lists/* /redis-$VER
CMD ["redis-server"]
More tips on reducing image sizes:
- https://www.cloudbees.com/blog/reduce-docker-image-size
- https://codefresh.io/blog/not-ignore-dockerignore-2/
Automate the commands
All of those Docker commands and their syntax might be hard to remember at first. Rather than looking them up every time, create a script. You may already be familiar with a scripting system that fits: Make.
- https://earthly.dev/blog/docker-and-makefiles/
- https://mario-gunawan.medium.com/stop-copy-pasting-old-scripts-use-makefile-instead-68331cdf6a32
Build a home lab
Once you are comfortable creating VMs and containers, the natural next step is a home lab: a small set of machines, real or virtual, that you own and can break without consequences. It is the single best way to learn systems administration, networking, and security, and it gives you something concrete to talk about in an interview.
A home lab can be as modest as two VMs on your laptop, or as elaborate as a retired desktop running a hypervisor full time. Start small.
Jeff McJunkin’s SANS webcast is a good tour of the options and how people actually put one together:
Building Your Own Super Duper Home Lab
Try it Build the smallest useful lab: one Linux VM and one intentionally vulnerable VM on the same virtual network, with no bridge to your real network. That is enough to start practicing safely. See Getting Started in Cybersecurity for which vulnerable machines to use and guides for wiring the network.